Author: Naveen Raj

Enhancing Content Safety: Unveiling the Advantages of Azure AI Content Safety

Azure AI Content Safety: Securing User Experiences

Leveraging Azure AI Content Safety: Key Benefits and Features

Azure AI Content Safety Overview

Azure AI Content Safety comprises a suite of cloud-based services that utilize artificial intelligence (AI) and machine learning (ML). These services provide content safety solutions for various scenarios and domains. Ensuring content safety is crucial for online platforms that enable users to generate, distribute, or access content. Content safety involves identifying and regulating harmful or unsuitable content, such as hate speech, vulgar language, nudity, violent content, spam, phishing, malware, etc. It can help protect users from exposure to harmful content and safeguard platforms from legal, regulatory, or reputational risks.

The suite offers the following services:

  • Text Analytics for Content Safety: This service analyzes text content and returns a score indicating the likelihood of the text containing potentially harmful or inappropriate language. The service can also identify harmful language categories and subcategories, such as personal attacks, sexual harassment, discrimination, profanity, etc. Users can customize the service to suit their domains and use cases.
  • Computer Vision for Content Safety: This service analyzes image and video content and returns a score indicating the likelihood of the content containing potentially harmful or inappropriate visual elements. The service can also identify harmful element categories and subcategories, such as adult, racy, gore, medical, etc. It supports various image and video formats and can be customized to suit specific domains and use cases.
  • Custom Content Safety: Users can build their custom models for content safety using Azure Machine Learning. They can utilize their data and labels to train and deploy custom models capable of detecting and moderating specific types of harmful or inappropriate content not covered by existing services.

How Azure AI Content Safety Works

Azure AI Content Safety applies advanced AI and ML techniques to analyze and classify content based on predefined or custom criteria. The services utilize deep neural networks to learn from extensive data and extract relevant features for content safety. They also employ natural language processing (NLP) and computer vision (CV) techniques to understand the meaning and context of the content.

The services expose REST APIs, allowing users to send content-related requests and receive responses containing content safety scores and labels. SDKs and client libraries for various programming languages simplify integration with existing applications. You can configure the services to suit different scenarios and domains using parameters such as language, domain-specific terms, custom models, etc.

Benefits

The services provide several benefits for users seeking to implement content safety solutions:

  • Scalability: Users can handle large volumes of content and requests with high performance and reliability. The services automatically scale up or down based on demand and traffic.
  • Accuracy: The services offer high accuracy and precision in detecting and moderating harmful or inappropriate content. They constantly update and improve with new data and models for the best results.
  • Customizability: Users can customize the services to fit different scenarios and domains. They can adjust parameters like language, domain-specific terms and use their data and labels to train and deploy custom models for specific content types.
  • Compliance: With Azure AI Content Safety, users can ensure compliance with legal and regulatory requirements related to content safety. The services adhere to the highest standards of security, privacy, and the principles of the Microsoft Trust Center.

Conclusion

Azure AI Content Safety is a cloud-based service suite that provides content safety solutions for various domains and scenarios. The services leverage AI and ML to analyze and moderate potentially harmful or inappropriate text, image, and video content. Users can benefit from the scalability, accuracy, customizability, and compliance features when implementing platform content safety solutions.
Take the Next Step: Embrace the Power of Cloud Services

Ready to take your organization to the next level with cloud services? Our team of experts can help you navigate the cloud landscape and find the solutions that best meet your needs. Contact us today to learn more and schedule a consultation.

Efficient Resource Optimization: How Azure Resource Visualizer Enables Streamlined Resource Utilization

Why Azure Resource Visualizer is Essential?

Why Azure Resource Visualizer is a Valuable Tool

Overview

Azure’s Resource Visualizer is an innovative feature seamlessly integrated into the Azure portal. It enables you to access it effortlessly through the settings of any Resource Group. You can swiftly generate a diagram encompassing all the resources within the selected resource group.

Azure Resource Visualizer

How Azure Resource Visualizer Helps

With Resource Visualizer, you can:

  • Visual Representation: The Resource Visualizer provides a graphical representation of your Azure resources. This allows you to visualize the structure and layout of your resources intuitively.
  • Dependency Visualization: The tool lets you see the relationships and dependencies between different Azure resources, helping you understand how they interact.
  • Resource Group Focus: The Visualizer allows you to focus on a specific resource group and view its resources. This provides a clear understanding of the resource hierarchy within the group.
  • Resource Documentation: You can export the visual diagrams from Resource Visualizer and use them for documentation purposes. This provides a clear and visual representation of your resource architecture.
  • Resource Planning and Management: Resource Visualizer helps you plan and manage your Azure resources more effectively by providing a high-level view of their relationships. This assists in optimizing resource deployments and configurations.
  • Collaboration and Communication: The visual diagrams created by Resource Visualizer can be shared with team members and stakeholders, facilitating better collaboration and communication about the resource architecture.
  • Resource Insights: Resource Visualizer provides insights into your architecture, allowing you to understand resource dependencies better and identify potential issues.

Conclusion

Overall, it is a valuable tool for understanding and visualizing the complex relationships between Azure resources. It simplifies the process of exploring your resource architecture, enhances collaboration among teams, and supports efficient resource management within your Azure subscription. To visualize your resources, click How to visualize your Azure Resources.

Take the Next Step: Embrace the Power of Cloud Services

Ready to take your organization to the next level with cloud services? Our team of experts can help you navigate the cloud landscape and find the solutions that best meet your needs. Contact us today to learn more and schedule a consultation.

Demystifying Azure Resource Visualizer: Step-by-Step Tutorial for Effective Resource Visualization

How Azure Resource Visualizer Works

Efficient Resource Mapping with Azure Resource Visualizer

Overview

In a scenario where you’re pressed for time and require an immediate diagram of your environment, wouldn’t it be convenient if there was a method to simply select your resources and automatically generate a comprehensive diagram? This diagram would not only display all the resources within your environment but also illustrate the relationships among them. Fortunately, Azure now offers a solution to fulfill this need.

Azure Resource Visualizer is a powerful feature integrated into the Azure portal that provides an interactive and visual representation of your Azure resources and their dependencies. It allows you to gain a comprehensive overview of your resource architecture and understand the relationships between different resources.

To use Azure Resource Visualizer

  1. Sign in to the Azure Portal.
  2. In the Search box, search for Resource group and choose Resource group from the result.
  3. In the Resource Groups pane, choose the required Resource group and click Resource Visualizer.

Note: By default, the diagram shows all resources in the subscription.

Azure Resource Visualizer

  1. To filter the resources, click Choose Resources.

The Resources pane appears.

  1. Choose the required resources to appear in the diagram.

The selected resources diagram appears.

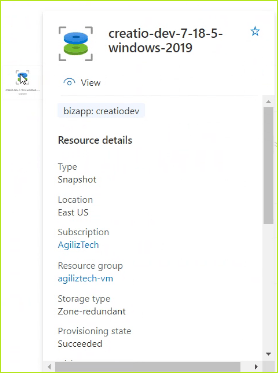
Tips: Hovering over a resource box displays a tooltip showing details such as resource type, name, and resource group.

Azure Resource Visualizer

  1. To export the diagram for further analysis or documentation, click Export PNG in the top-right corner of the Azure Resources Visualizer pane.

This downloads the diagram as a PNG image file.

That’s it! You can now use Azure Resources Visualizer to explore and understand the relationships between your Azure resources visually and intuitively.

Take the Next Step: Embrace the Power of Cloud Services

Ready to take your organization to the next level with cloud services? Our team of experts can help you navigate the cloud landscape and find the solutions that best meet your needs. Contact us today to learn more and schedule a consultation.

Creating an Amazon Virtual Private Cloud (VPC): A Simple and Clear Step-by-step Guide

Amazon Virtual Private Cloud: Step-by-step Guide

Creating Amazon Virtual Private Cloud (VPC)

Overview

You can start up AWS services in a predefined virtual network that is logically separated using Amazon Virtual Private Cloud (Amazon VPC). This virtual network has the advantage of leveraging the scalable infrastructure of AWS while closely resembling a conventional network you would manage in your own data center.

To create an Amazon Virtual Private Cloud

  1. Sign in to the AWS Management Console.
  2. In the Search box, search for VPC and choose VPC from the results.

The VPC dashboard pane appears.

  1. Click Create VPC.

The Step 1: Select a VPC Configuration pane appears.

Creating Amazon Virtual Private Cloud

  1. Choose VPC with Public and Private Subnets and then click Select.

The Step 2: VPC with Public and Private Subnets pane appears.

  1. Do the following:
    1. In the IPv4 CIDR block box, type the required IPv4 CIDR.
    2. For IPv6 CIDR block, click No IPv6 CIDR Block.
    3. In the VPC name box, type a name for the VPC.
    4. In the Public subnet’s IPv4 CIDR box, type the required subnet.
    5. In the Availability Zone list, choose No Preference or the required zone.
    6. In the Public subnet name box, type a name.
    7. For Enable DNS hostnames, click Yes.
    8. In the Hardware tenancy list, choose Default.
  2. Click Create VPC.

The newly created VPC appears in the Your VPCs pane.

Take the Next Step: Embrace the Power of Cloud Services

Ready to take your organization to the next level with cloud services? Our team of experts can help you navigate the cloud landscape and find the solutions that best meet your needs. Contact us today to learn more and schedule a consultation.

Creating an Amazon S3 Bucket: A Simple and Clear Step-by-step Guide

Amazon S3 Bucket Creation: Step-by-step Guide

Creating Amazon S3 Bucket in AWS Console

Overview

Amazon S3 Bucket or Amazon Simple Storage Service is a highly scalable, secure, and performant object storage service. It caters to customers of various sizes and industries, offering a wide array of use cases for data storage and protection. These use cases encompass data lakes, websites, mobile applications, backup and restore operations, archival purposes, enterprise applications, IoT devices, and big data analytics.

Amazon S3 not only ensures data availability but also provides robust security measures. It empowers users with management features that enable optimization, organization, and customized access configuration to meet specific business, organizational, and compliance needs.

To Create an Amazon S3 bucket

  1. Sign in to the AWS Management Console.
  2. In the Find Services box, type S3 and choose Amazon S3 from the results.
  3. In the left pane, under Amazon S3, click Buckets.
  4. In the Buckets pane, click Create bucket.

The Create bucket pane appears.

Creating Amazon S3 Bucket

  1. Under General configuration, do the following:
    1. In the Bucket name box, type a unique bucket name.
    2. In the AWS Region list, choose the required region.
    3. To copy settings from the existing bucket, click Choose bucket and choose the required bucket settings.
  2. Under Object Ownership, go with the default option ACLs disabled (recommended).
  3. Under Block Public Access settings for bucket, select Block all public access
  4. Under Tags – optional, click Add tag to track storage costs and organize buckets.
  5. Under Default encryption, do the following:
    1. For Encryption key type, click Amazon S3 managed keys (SSE-S3).
    2. For Bucket key, click Enable.
  6. Under Advanced settings, for Object Lock, choose Enable if you want to enable object lock.

Note: Object Lock for a bucket may only be turned on at the time of creation; it cannot be turned off afterwards. Versioning for the bucket is also enabled by turning on Object Lock. To prevent new objects from being destroyed or rewritten after activation, you must adjust the Object Lock default retention and legal hold settings.

  1. Choose Create bucket.

The newly created bucket appears in the Buckets pane.

Creating Amazon S3 Bucket

Take the Next Step: Embrace the Power of Cloud Services

Ready to take your organization to the next level with cloud services? Our team of experts can help you navigate the cloud landscape and find the solutions that best meet your needs. Contact us today to learn more and schedule a consultation.

Step-by-step Guide: Creating Amazon Network Load Balancer with Ease

Amazon Network Load Balancer Creation: Procedures

Creating Amazon Network Load Balancer

Overview

Amazon’s Network Load Balancer operates on the fourth layer of the Open Systems Interconnection (OSI) model, enabling efficient handling of millions of requests every second. Upon receiving a connection request, the load balancer intelligently chooses a target from the designated target group based on the default rule. It then proceeds to establish a TCP connection with the selected target, utilizing the port specified in the listener configuration.

To create an Amazon network load balancer

  1. Sign in to the AWS Management Console.
  2. In the Find Services box, type EC2 and choose EC2 from the results.
  3. In the left pane, under Load Balancing, choose Load Balancers.

The Load Balancers pane appears.

  1. Click Create load balancer.

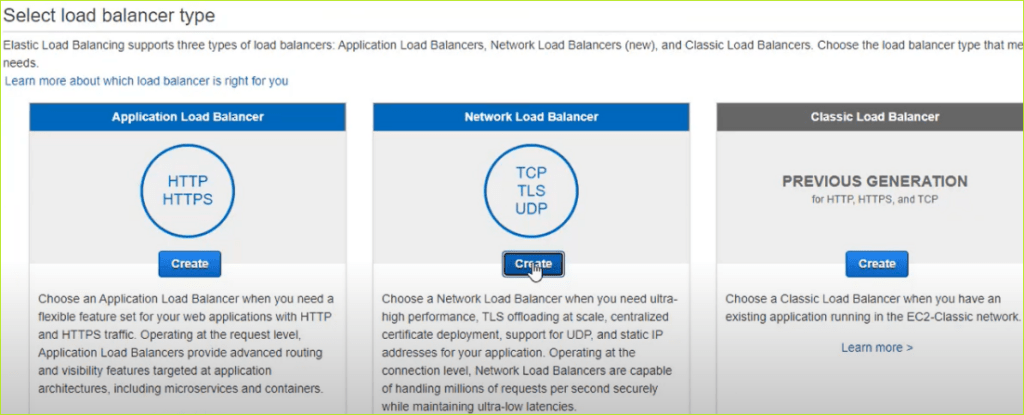
The Load balancer types pane appears.

Creating Amazon Network Load Balancer

  1. Under Network Load Balancer, click Create.

The Create Network Load Balancer pane appears.

  1. Under Basic configuration, do the following:
    1. In the Load balancer name box, enter a name for the load balancer.
    2. For Scheme, click Internet-facing.
    3. For IP address type, click IPv4.
  2. Under Network mapping, do the following:
    1. In the VPC list, choose the virtual private cloud for the targets.
    2. For Mappings, select the checkbox for the availability zones. You can select one subnet per availability zone.
  3. Under Security groups, in the Security groups list, choose a security group or create one.
  4. Under Listeners and routing, do the following:
    1. Under Listener HTTP:80, in the Default action list, choose a target group or click Create target group to create a new target group.
    2. Click Add listener tag (optional) to add a tag.
    3. To add another Listener, click Add listener.
  5. For AWS Global Accelerator (optional), select the checkbox to create an accelerator and associate the load balancer with accelerator.
  6. Under Load balancer tags (optional), choose Add tag, and enter the key and value.
  7. Under Summary, review the configuration details and click Create load balancer.

Creating Amazon Network Load Balancer

Take the Next Step: Embrace the Power of Cloud Services

Ready to take your organization to the next level with cloud services? Our team of experts can help you navigate the cloud landscape and find the solutions that best meet your needs. Contact us today to learn more and schedule a consultation.

Simplified Load Balancer Setup: A Step-by-step Guide for Amazon Application Load Balancer

Amazon Application Load Balancer Creation: Procedures

Creating Amazon Application Load Balancer

Overview

The Amazon Application Load Balancer operates at the application layer, which corresponds to the seventh layer of the Open Systems Interconnection (OSI) model. Upon receiving a request, the load balancer assesses the listener rules in a hierarchical order to identify the appropriate rule to apply. Subsequently, it chooses a target from the target group associated with the rule’s action.

To create an Amazon application load balancer

  1. Sign in to the AWS Management Console.
  2. In the Find Services box, type EC2 and choose EC2 from the results.
  3. In the left pane, under Load Balancing, choose Load Balancers.

The Load Balancers pane appears.

  1. Click Create load balancer.

The Load balancer types pane appears.

  1. Under Application Load Balancer, click Create.

The Create Application Load Balancer pane appears.

Creating Amazon Application Load Balancer

  1. Under Basic configuration, do the following:
    1. In the Load balancer name box, enter a name for the load balancer.
    2. For Scheme, click Internet-facing.
    3. For IP address type, click IPv4.
  2. Under Network mapping, do the following:
    1. In the VPC list, choose the virtual private cloud for the targets.
    2. For Mappings, select the checkbox for the availability zones. You can select one subnet per availability zone.
  3. Under Security groups, in the Security groups list, choose a security group or create one.
  4. Under Listeners and routing, do the following:
    1. Under Listener HTTP:80, in the Default action list, choose a target group or click Create target group to create a new target group.
    2. Click Add listener tag (optional) to add a tag.
    3. To add another Listener, click Add listener.
  5. For AWS Global Accelerator (optional), select the checkbox to create an accelerator and associate the load balancer with the accelerator.
  6. Under Load balancer tags (optional), choose Add tag, and enter the key and value.
  7. Review the configuration details under Summary and click Create load balancer.

Creating Amazon Application Load Balancer

Take the Next Step: Embrace the Power of Cloud Services

Ready to take your organization to the next level with cloud services? Our team of experts can help you navigate the cloud landscape and find the solutions that best meet your needs. Contact us today to learn more and schedule a consultation.

Step-by-step Tutorial: Creating Target Groups for Seamless Request Routing

Creating Target Group: Step-by-step Guide

Creating Target Group in AWS Console

Overview

In AWS, a target group serves the purpose of routing requests toward one or more registered targets. You can specify a target group for its default action upon creating a listener. The traffic is then directed to the target group specified in the listener rule. Creating multiple target groups tailored to different types of requests is possible. For instance, you can create a target group specifically for general requests, and create separate target groups to handle requests directed towards the microservices within your application.

To create Target Group in AWS Console

  1. Sign in to the AWS account.
  2. In the Find Services box, type EC2 and choose EC2 from the results.
  3. In the right pane, under LOAD BALANCING, choose Target Groups.

The Target groups pane appears.

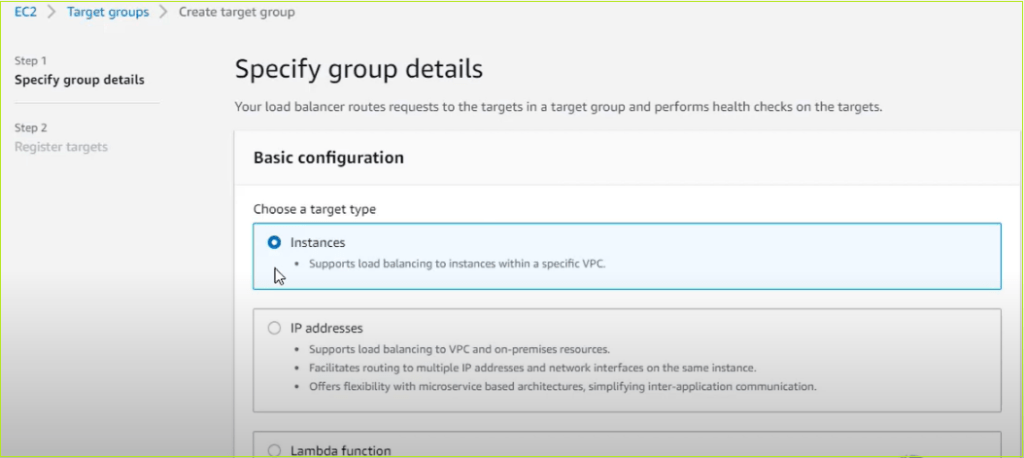
  1. Choose Create target group.

The Create target group pane appears.

Creating Target Group

  1. Under Basic configuration, do the following:
    1. For Choose a target type, click
    2. In the Target group name box, enter a name for the target group.
    3. For Protocol list, choose the required protocol.
    4. In the Port list, change the default value as required.
    5. For IP address type, click IPv4 or IPv6.
    6. In the VPC list, choose the virtual private cloud (VPC) with the targets to register.
  2. Under Health checks, modify the default settings as needed.
  3. Under Tags – optional, expand Tags, choose Add a tag, and type a tag key and a tag value.
  4. Choose Next.

The Register targets pane appears.

  1. In the Register targets pane, choose the instances, enter the ports, and choose Include as pending below.
  2. Choose Create target group.

The newly created Target group appears in the Target groups pane.

Take the Next Step: Embrace the Power of Cloud Services

Ready to take your organization to the next level with cloud services? Our team of experts can help you navigate the cloud landscape and find the solutions that best meet your needs. Contact us today to learn more and schedule a consultation.

AMI Creation Simplified: A Step-by-Step Guide for Creating Amazon Machine Images

Creating Amazon Machine Image: Procedures Guide

Creating Amazon Machine Image (AMI) in AWS Console

Overview

An Amazon Machine Image (AMI) is a pre-configured and maintained image offered by AWS, containing all the necessary information to initiate an instance launch. When launching an instance, it is essential to specify an AMI. Creating Amazon Machine Images helps you create multiple instances with identical configurations, you can launch them from a single AMI. Conversely, you can utilize different AMIs to initiate their launch if you require instances with diverse configurations.

To create Amazon Machine Image

  1. Sign in to the AWS Management Console.
  2. In the Find Services box, type EC2 and choose EC2 from the results.
  3. In the left pane, under Instances, click Instances.

The EC2 instances dashboard appears.

Creating Amazon Machine Image

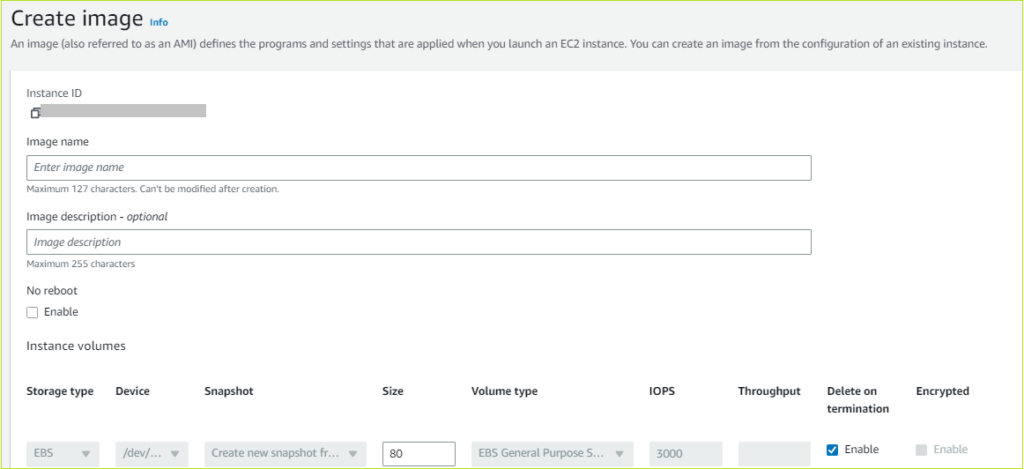
  1. Choose the Instance to create the AMI, choose->Actions->Image and templates->Create image.

The Create image pane appears.

  1. In the Image name box, enter a name for the image.
  2. In the Image description – optional box, enter a brief description of the image.
  3. For No reboot, keep the default value (Enable checkbox cleared).
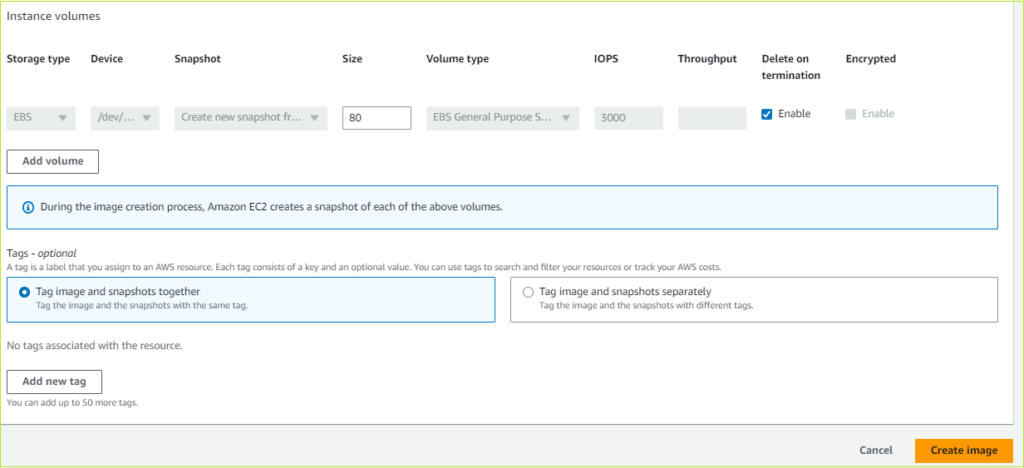
  4. Under the Instance volumes, do the following:
    1. In the Size box, enter the size of the volume.
    2. For Delete on termination, select the Enable
    3. To add another volume, click Add volume.
    4. Under Tags – optional, click Tag image and snapshots together.
  5. Click Create image.

Creating Amazon Machine Image

The new AMI appears in the Amazon Machine Images (AMIs) pane.

Note: The creation of the AMI could take a few minutes. It will appear in AWS Explorer’s AMIs view as soon as it is produced. The AMI may initially show in a pending state but changes to an available state after a brief interval.

Take the Next Step: Embrace the Power of Cloud Services

Ready to take your organization to the next level with cloud services? Our team of experts can help you navigate the cloud landscape and find the solutions that best meet your needs. Contact us today to learn more and schedule a consultation.

Simplified Walkthrough: Launching Amazon EC2 Instances in the AWS Console

Launching Amazon EC2 Instance: Step-by-step Guide

Launching Amazon EC2 Instance in AWS Console

Overview

Amazon EC2 offers a diverse set of instance types that are tailored to certain use cases. Instance types are different combinations of CPU, memory, storage, and networking capabilities that allow you to pick the best mix of resources for your applications. Each instance type comes with one or more instance sizes, allowing you to scale your resources to meet the needs of your intended workload. Refer to the steps below for launching an Amazon EC2 Instance.

To launch Amazon EC2 Instance

  1. Sign in to AWS Management Console.
  2. In the Find Services box, type EC2 and choose EC2 from the results.
  3. In the left pane, under Instances, choose Instances.

The EC2 instances dashboard appears.

  1. Choose Launch instances.

The Launch an instance pane appears.

Launching Amazon EC2 Instance

  1. Under Name and tags, type a name and tag details.
  2. Under Application and OS Images (Amazon Machine Image), in Quick Start tab choose the required Image. For example, Red Hat.
  3. Click 64-bit (Arm) and then click Select.
  4. In the AMI from catalog tab, click Free tier eligible.
  5. In the Instance type list, choose the instance type.
  6. In the Key pair (login) list, choose a key pair name.

To create a new key pair, click Create new key pair.

The Create key pair page appears. Type a name for the key pair, choose key pair type and private key file format and then click Create key pair.

  1. Under Network settings, do the following:
    1. In the VPC required list box, choose the required VPC.
    2. In the Subnet list box, choose the required subnet or create one by clicking Create new subnet.
    3. In the Auto-assign public IP list, choose Disable.
    4. For Firewall (security groups), click Select existing security group.
    5. In the Common security groups list, choose security groups.
  2. Under Configuration storage, add the required number of volumes.
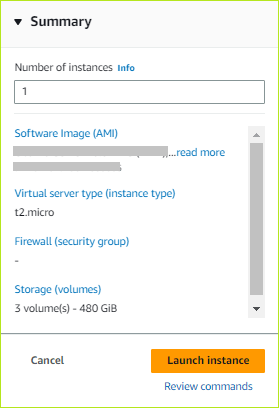
  3. Under Summary, in the Number of instances box, enter the number of instances to launch.
  4. Review the instance details and click Launch instance.

Launching Amazon EC2 Instance

The Instance is created and appears in the EC2 dashboard.

Take the Next Step: Embrace the Power of Cloud Services

Ready to take your organization to the next level with cloud services? Our team of experts can help you navigate the cloud landscape and find the solutions that best meet your needs. Contact us today to learn more and schedule a consultation.

Close Bitnami banner
Bitnami