Tag: customization

Updating Access Rights in bulk for Accounts and Contacts

Problem Statement

In the Creatio (formerly bpm’online) CRM there is a need to set limitations in accessing the Contacts and Accounts section wherein the users can have access only for limited records. In the present scenario, Creatio (formerly bpm’online) customer has a huge number of Contacts and Accounts, and their users had access to the entire records. In this post we will discuss, how to update the access rights for Accounts and Contacts section in bulk and check the same for each record with the help of a flag on table through a business process.

Solution

Access rights set up wizard for bpm’online https://marketplace.bpmonline.com/app/access-rights-setup-wizard-bpmonline is an add-on available in bpm’online marketplace to grant and change access rights for existing records.

This add-on could update only 100 contacts and accounts in one go and we could not monitor the progress of updates happening. Hence, we resolved it with a simple process mentioned below to grant or deny permissions for Creatio (formerly bpm’online) records and we could update 8000 contacts and accounts in a single run.

Image for the process that we created to achieve this in Contact Section

Creatio

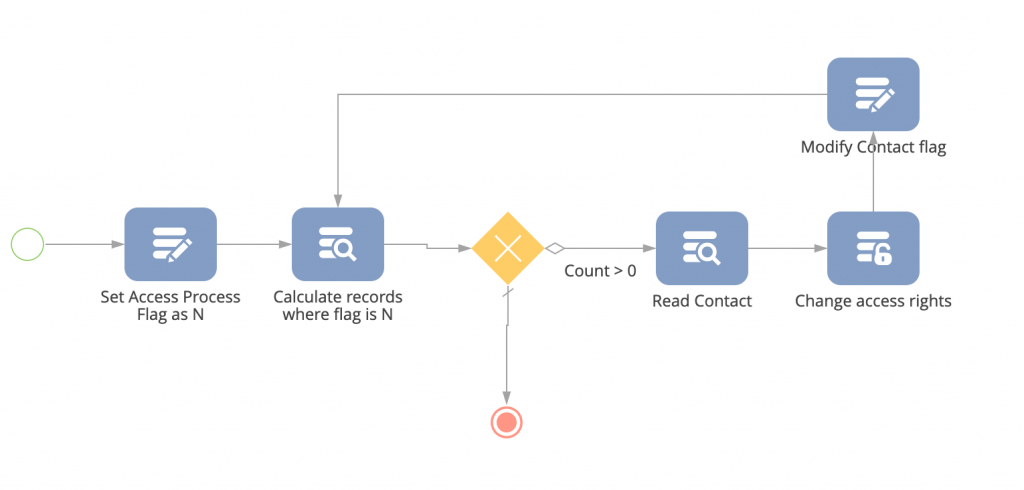
Description of the process:

 Set Access Process Flag as N: We used ‘Modify Data’ element to set the value of flag created in section. Based on the business condition, we set value of Flag as ‘False’ (N)

Calculate records where flag is N: We used ‘Read Data’ element to ‘Calculate the number of records’ on ‘Contacts’ section where ‘Access Processed Flag’ = ‘N’ . Other necessary condition to filter records could also be added based on business use case.

‘OR’ Gateway: We used ‘Exclusive Gateway (OR)’ element to branch the flow.

Conditional Flow Branch: To move down the flow, Condition was set to check if the count of records is greater than 0, then move forward.

Default flow: Default branch was used to end the process.

Read Contact: We used ‘Read Data’ element where ‘Access Processed Flag’ = ‘N’. Other necessary condition to filter records could also be added based on business use case.

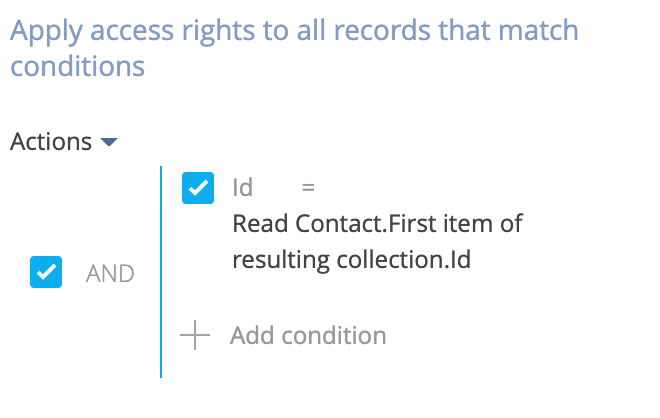
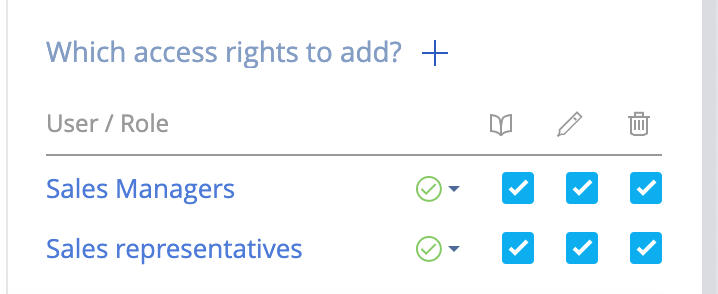
Change Access Rights: For applying access, we used this condition and added the ‘Read’, ‘Edit’ and ‘Delete’ permission for user role same as the business requirement.

Creatio

Creatio

Modify Contact Flag: In the end, we used ‘Modify Data’ element to modify the value of ‘Access Processed Flag’ as ‘True’. This will help us to identify the record whose access is modified.

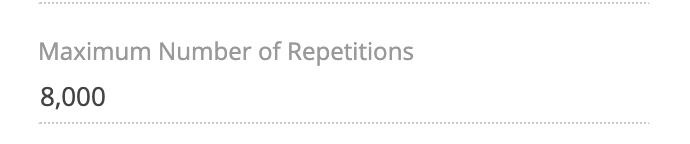
Settings of Business Process:  We increased the number of iterations to achieve this in bulk, based on the number of contacts in system. This is configurable based on the business case requirement.

Pro Tip: We could monitor the process through checking the number in quantity and refreshing it when the process was running.

We added a filter on Contacts section with the field ‘Access Processed Flag’ and values as ‘Yes’ and kept on refreshing the system to see the count going up.


Creatio

In the second batch, run the process (if required), we can filter records where ‘Access Processed Flag’ = ‘N’ under set access process flag element for ‘modify records that match the condition’.

We did the same for ‘Accounts’ section using similar process as above but changed the section.

Creatio

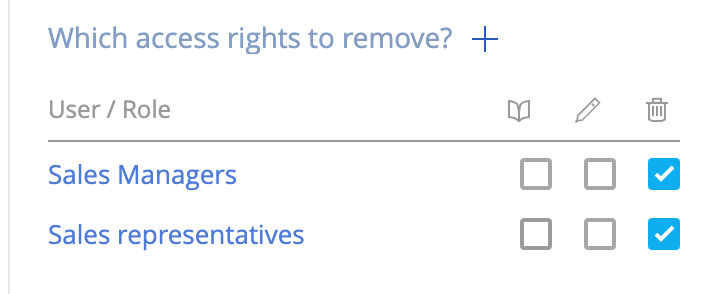
In the later requirement, to revoke ‘Delete’ permission for 2 user roles, we used similar process but changed values in ‘Change access rights’ element.

Benefits

This solution helped us grant and revoke certain permissions to specific roles based on customer requirement. We could also monitor the performance while the process is running.

AgilizTech does customization forCreatio (formerly bpm’online) based on the requirements of a business. You can check out our posts for more information on Creatio customization.

WordPress landing page integration with custom object in Creatio (formerly bpm’online)

Problem Statement
During a lead generation process of a sales / marketing team, they should have the ability to capture as much as information about their lead in the Creatio (formerly bpm’online) CRM. Currently Creatio supports to capture few of the standard sections like leads, cases, orders & event registration through a WordPress integration of landing pages. This blog is about how to capture additional information to be gathered via landing pages other than the standard sections available as of today.

Solution
In this blog we will learn about the steps that needs to be followed to integrate WordPress landing page with a custom object in Creatio (formerly bpm’online).

Steps for integrating a WordPress landing Page to custom section

Creatio (formerly bpm’online) configurations
Create the custom object to which landing page needs to be integrated. For example; create an object “UsrAdditionalCustomerData” (sample object name for explanation purpose)

In the [Landing pages and webforms] section, you can select one of the default webforms available as given below (Fig.1).

Fig. 1
Creatio

In order to add new registration form for the custom object:

1. Add a new type “Additional Customer Data” landing page to the “Landing types” lookup, which is connected to the custom section.

Fig. 2

Creatio

2. After adding a new web form in the “Landing types” lookup, use the Section Wizard to add a new page in the [Landing pages and web forms] section for the newly added type. To open the Section Wizard, go to the [Landing pages and web forms] section, and in the [View] menu select [Open section wizard] (Fig.3 & Fig.4).
Fig.3

Creatio

Fig.4

3. Add new additional customer data web registration form in the section wizard (Fig.5). After saving you can see the additional customer data web registration form in the new dropdown (Fig.6).
Fig.5

Creatio

Fig.6

Creating the landing page for custom object
Add new additional customer data web from and save the record. You can get the landing Id for the saved web page from the link (Fig.7). This landing Id can be used to integrate the landing page and web form in WordPress.

Fig.7

Integrating the WordPress Page to Custom Object

Install bpm’online plugin for WordPress (gravity forms, Contact form7). The steps to integrate bpm’online to a WordPress contact form is mentioned in the link below.
https://community.bpmonline.com/articles/bpmonline-plugin-wordpress-gravity-forms-contact-form-7?_ga=2.73954770.153193264.1562563622-1951839029.1560317595
In mapping of the fields (WordPress), 3rd party fields should be the column names in the UsrAdditionalCustomerData table (custom object) (Fig.8).
Fig.8

Creario

Use the Landing Id (Fig.7) as the form Id and the column names of the additional customer data table for mapping the landing page fields.

Processing the submitted data in Creatio (formerly bpm’online)

After integration, when a new set of data is submitted in the additional customer data landing page, a corresponding record will be created in UsrAdditionalCustomerData object.
You can write a process to link the newly created record with the corresponding lead automatically or, can give a page where the sales team can review the submitted data and connect with corresponding lead.

Benefits
The solution helps in acquiring additional details (like customer requirement, alternate address, alternate contact information, additional company information etc.) of potential leads from a WordPress landing page.
To learn more on how AgilizTech does customization for bpm’online visit our Creatio blog were we have explained different ways of customization for a business as per their requirements.

AgilizTech’s customization for Creatio (formerly bpm’online) – Look up filtration based on flag in mobile app

In this fourth post of the series we will be discussing how to list only active products in the product selection page of the Sales Creatio (formerly bpm’online) enterprise edition mobile app.

The product section in mobile app has provision to activate or inactivate the products. In the desktop version if a product is inactivated, it will not list in any product selection page. In mobile page, however by default the product will be listed.

Business use case:

To display active products only in the production selection while booking orders through bpm’online mobile app.

Product:  Sales Creatio enterprise edition

Applicable for Version: 7.13 & above

Below is the desktop version of  Sales Creatio enterprise wherein you can see that the Product Inactivated does not appear in the product selection page.

Fig 1: Product Inactivated

Creatio

Whereas in the product selection page of the Creatio (formerly bpm’online) mobile app the inactive product will be listed. This can be corrected by applying a certain code.

Fig 2: Before applying code change, product will be listed in mobile product lookup

Creatio

Fig 3: After applying the code change, product will not be listed in lookup

Creatio

Filtration of lookup columns based on the flag or a column is demonstrated below.

You should be knowing in which Workplace the changes need to be done. Select the workplace first to apply the changes.

In Custom package > MobileApplicationManifestDefaultWorkplace

For Example:

UsrMobileFilterModelConfig – If this is the business rule created for filtering the columns based on other columns, then you will have to mention this name in Model > Object’s Page Extension section.

Refer below code:

“Models”: {
“Order”: { {
“RequiredModels”: [
“Order”,
“Account”,
“OrderStatus”,
“OrderPaymentStatus”,
“OrderDeliveryStatus”,
“Currency”,
“DeliveryType”,
“PaymentType”,
“LeadType”,
“SocialMessage”,
“OrderProduct”,
“Product”,
“Unit”,
“Pricelist”,
“OrderVisa”,
“VisaStatus”
],
“ModelExtensions”: [],
“PagesExtensions”: [
” UsrMobileFilterModelConfig “, // Module Name
“UsrMobileOrderGridPageSettingsDefaultWorkplace”,
“UsrMobileOrderRecordPageSettingsDefaultWorkplace”
]
},
}

Create a module with the specified name. In this example it is UsrMobileFilterModelConfig.

In UsrMobileFilterModelConfig. module write the business event for Accessibility.

Find the code below.

Terrasoft.sdk.Model.addBusinessRule(“OrderProduct”,{
ruleType:Terrasoft.RuleTypes.Filtration,
events:[
Terrasoft.BusinessRuleEvents.Load,
Terrasoft.BusinessRuleEvents.Insert,
Terrasoft.BusinessRuleEvents.ValueChanged
],
triggeredByColumns:[“Product”],
filters:Ext.create(“Terrasoft.Filter”,{
modelName:”Product”,
property:”IsArchive”,
value:false
})
});

Here we are filtering “Product” lookup column in Order Products, based on Is Archive field in the product object. If the value is false, product will be listed; if value is correct i.e. if product is inactive, it won’t be listed. This Filtration should work while inserting new order, i.e. selecting a product for new order and while editing order product list for an existing order.

The event handling is explained below:
Find the code below.

events:[
Terrasoft.BusinessRuleEvents.Load, //On Data Load
Terrasoft.BusinessRuleEvents.Insert, //upon inserting new
Terrasoft.BusinessRuleEvents.ValueChanged //While Editing
]

Hence, if the above code is applied the inactive products will not be listed in the mobile product look up.

Click here to navigate to the main blog post which contains the complete list of Creatio (formerly bpm’online) customization use cases.

AgilizTech’s Customization for Creatio (formerly bpm’online) – Conditionally Enable / Disable Field in bpm’online mobile app

In this blog we will be discussing on how to conditionally enable or disable a field in Creatio (formerly bpm’online) mobile app.

In this third use case, the user can enter the product details, price and quantity needed, and can edit the total amount field in the order page of the mobile app. The total amount field should be an auto computed one based on the price and quantity given at order product level. To restrict this we have created a code which completely disables the ‘order total amount’ field.

creatio

Figure:1 By default if you add the “total order amount” in mobile page, it will be editable.

creatio

Figure:2 After applying the below code, the field will not be editable.

How to make changes in the page?

To apply these changes and set the corrections, you should be aware of the workplace in which the changes have to be done.

In the Custom package > MobileApplicationManifestDefaultWorkplace select the mobile app workplace where the changes need to be done.

As a business rule, the module UsrMobileDisableModelConfig must be created and you need to write the business event for accessibility.

Below is the code for this customization:

Terrasoft.sdk.Model.addBusinessRule(“Order”,{
ruleType : Terrasoft.RuleTypes.Activation,
events:[Terrasoft.BusinessRuleEvents.Load,Terrasoft.BusinessRuleEvents.ValueChanged],
triggeredByColumns : [“Id”],
conditionalColumns :[ {name :”Id”,value : “Disable All the time”} ],
dependentColumnNames : [“Amount”]

The above code will disable ‘amount’ field which stores the ‘total order value’only if the order ID field is having a value other than the value mentioned in the condition line (i.e. value of ‘Disable All the time’). In this code we have chosen ‘ID’ field as the conditional field, but you can choose a field of your choice as per the business need.

Once UsrMobileDisableModelConfig module is created, we need to place this in the
custom package >  MobileApplicationManifestDefaultWorkplace

For Example:
UsrMobileDisableModelConfig – if this Business rule is created for accessing the columns, then you will have to mention this name in Model > Object’s Page Extension section.

Below is the code:

“Models”: {
“Order”: {
“RequiredModels”: [
“Order”,
“Account”,
“OrderStatus”,
“OrderPaymentStatus”,
“OrderDeliveryStatus”,
“Currency”,
“DeliveryType”,
“PaymentType”,
“LeadType”,
“SocialMessage”,
“OrderProduct”,
“Product”,
“Unit”,
“Pricelist”,
“OrderVisa”,
“VisaStatus”
],
“ModelExtensions”: [],
“PagesExtensions”: [
” UsrMobileDisableModelConfig “, // Module Name
“UsrMobileOrderGridPageSettingsDefaultWorkplace”,
“UsrMobileOrderRecordPageSettingsDefaultWorkplace”
]
},
}

Once the above codes are implemented, the user cannot change the order amount because the field will be disabled.
Click here to navigate to the main blog post which contains the complete list of Creatio (formerly bpm’online) customization use cases.

Different ways Creatio (formerly bpm’online) can be customized for your business’ unique needs

Creatio (formerly bpm’online) is a global business software company leading in the space of business process automation and CRM. The company has been highly recognized as a market leader by key industry analysts. Its intelligent platform accelerates sales, marketing, service and operations for thousands of customers and hundreds of partners worldwide.

AgilizTech partners with bpm’online to deploy and implement advanced CRM solutions that helps organizations strengthen customer acquisition, retention, loyalty and advocacy strategies.

We work with clients to customize Creatio (formerly bpm’online) as per their unique organizational needs. In this series of blog posts, we will explore certain scenarios in which customization can be made to improve efficiency and increase productivity.

We will be adding blog posts for each of the use cases mentioned below in the coming weeks. Do stay tuned to learn how Creatio (formerly bpm’online) can be tailored to suit your unique organizational needs.

Use Case 1: Custom Section Filters to view records

Use Case 2: Conditionally Hide/Show Fields in app

Use Case 3: Disable Edit of Total Amount Field

Use Case 4: Enable Display of Active Products in System

Use Case 5: WordPress Landing Page Integration 

Update Access Rights For Accounts and Contacts

Coming soon….

Lead and Opportunity Turn Around Time (TAT) in Creatio


Close Bitnami banner
Bitnami