Creating an Azure Application Gateway
The Azure Application Gateway is a load balancer designed to manage web traffic directed toward your web applications. It enables routing decisions using various attributes of an HTTP request, such as URI path or host headers. With Application Gateway, you have the power to efficiently handle and control the flow of traffic to your web applications.
To create an Azure Application Gateway
- Sign in to the Azure Portal account where VM needs to be created.
The Azure Portal Home pane appears. - Under Azure Services, click Create a Resource.
The Create a resource pane appears. - In the Search box, search for Application gateway and choose Application gateway from the results. The Create application gateway pane appears.
Basics
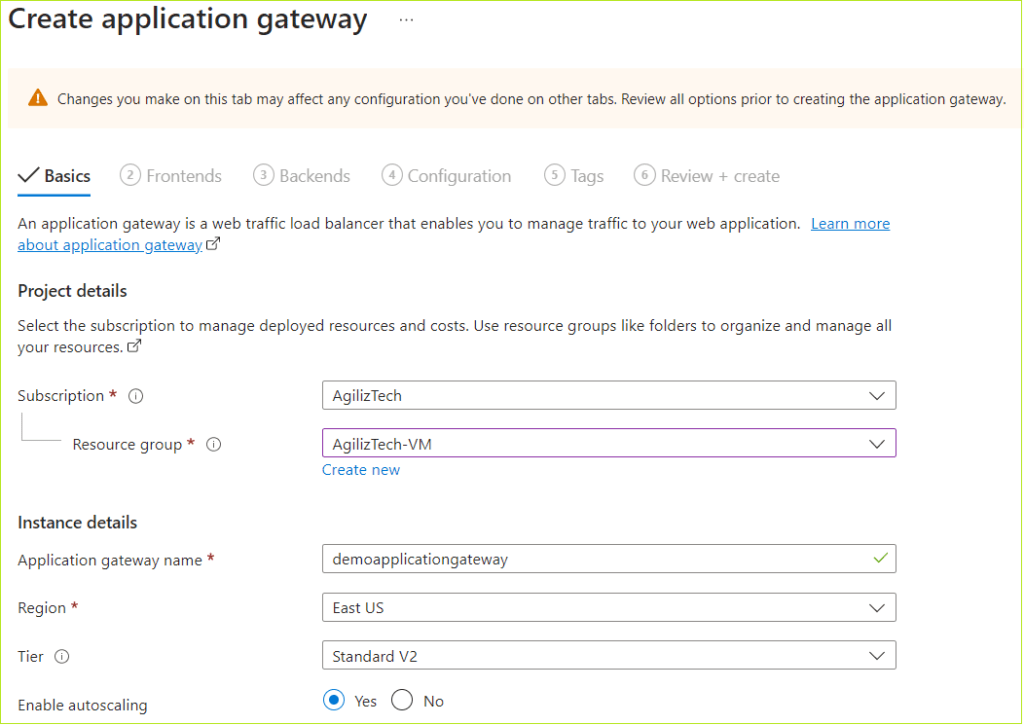
You can use Basics pane to add project details, instance details, create administrator account, and Inbound port rules.
- Under Project details, do the following:
- In the Subscription list, choose the required subscription.
- In the Resource group list, choose the required resource group.
If you do not have one, click Create new, enter the name, and click OK.
- Under Instance details, do the following:
- In the Application gateway name box, type a name.
- In the Region list, choose the required region.
- In the Tier list, choose the required tier.
- For Enable autoscaling, choose the Yes option.
- In the Minimum instance count and Maximum instance count boxes, enter the required numbers.
- In the Availability zone list, choose the required zone.
- For HTTP2, choose Disabled option.
- Under Configure virtual network, do the following:
- In the Virtual network list, choose the required virtual network.
- In the Subnet list, choose the default subnet.
- Click Next : Frontends >. The Frontends pane appears.
Frontends
You can use Frontends pane to configure Public, Private or Both IP addresses.
To configure frontends
- For Frontend IP address type, choose Public option.
- In the Public IP address list, choose a public IP address.
- Click Next : Backends >. The Networking pane appears.
Backends
You can use Backends pane to define the backend servers or virtual machines that will receive traffic. You can add multiple backend servers for load balancing purposes.
To add a backend pool
- In the Backends pane, choose Add a backend pool. The Add a backend pool pane appears.
- In the Name box, type a name for the backend pool.
- For Add backend pool without targets, choose Yes and then choose Add. The added backend pool appears in the Backends pane.
- Click Next : Configuration >.
The Configuration pane appears.
Configuration
You can use Configuration pane to create routing rules that link the frontends and backends.
To configure a routing rule
- Under Routing rules, choose Add a routing rule. The Add a routing rule pane appears.
- In the Rule name box, type a rule name.
- In the Priority box, type a priority number. You can choose between 1 and 20000 where 1 represents the highest priority.
- In the Listeners tab, do the following:
- In the Listeners name box, type a name.
- In the Frontend IP list, choose Public.
- For Protocol, choose HTTP option.
- Under Additional settings, go with default.
- In the Backend targets tab, do the following:
- For the Target type, choose Backend pool option.
- In the Backend target list, choose the backend pool created earlier.
- For Backend settings, choose Add new. The Add Backend settings pane appears.
- In the Backend settings name box, type a name.
- In the Backend port box, type 80.
- Accept default values for all other settings and then choose Add. The Configuration pane appears.
- Click Next : Tags >.
The Tags pane appears.
Tags
- Enter a name for the tag in the Name box.
- In the Value box, enter a value.
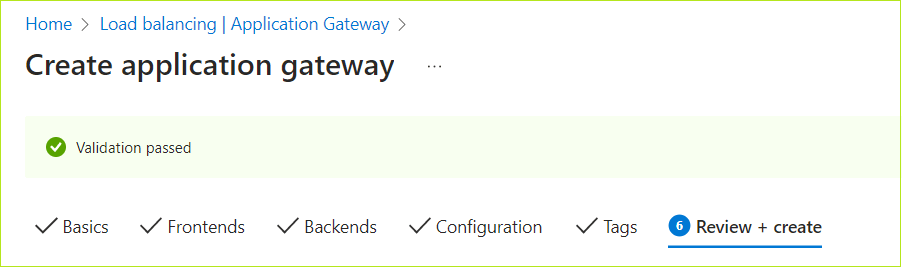
- Click Next : Review + create >. The Review + create pane appears.
Review + create
- Once the validation is passed, review the Application gateway details and click Create.